It’s been a few years since our last stay in Carmel, so on our drive over, I started looking up the wine tasting rooms in town. I saw many mentions of the wine passport or wine walk, so I looked into it and we decided to buy it to see if it was worth the hype. I wasn’t exactly sure how it worked, but figured that since we would be visiting a lot of tasting rooms (all walkable, which is a huge plus), we would get some value from the passport.
Was it worth it? For us, no. For some people, maybe. There are 13 wineries that participate and we only really visited 6 of them (although one has a shared room with a winery we tasted at, so we had wines from 7 of them, and one I just went in to check out so I know how it’s set up). For the most part, there is no discount if you have the wine walk cards, but I’ll get into the specifics at each tasting room (that we went to).
The wine walk passports can be purchased at the Visitor Center at Carmel Valley Plaza (if you enter on the Ocean Avenue side, it’s on that same level). The cost is $100 and it can be shared – you’re given 10 separate “wine walk cards” so you could even split it between 10 people at one winery. With the passport you get one 10% coupon that can be used at any of the wineries. This alone could make it worth it. Although we bought wine, we didn’t use the card yet, but I plan to use it in the future. Which brings me to the next detail – these cards don’t ever expire! I’m just hoping I don’t lose our leftover cards before our next trip!
As I mentioned above, this isn’t a great deal and had I known more about it beforehand, I would have passed. But since I didn’t, here’s a quick review of each wine tasting room we visited, and how the cards worked (or didn’t work) for us:
This was our first stop after purchasing the wine passport. Unfortunately, they are not one of the 13 participating wineries (oops!). They just opened the day before, so they very well could be added to the wine walk passport in the future. The tasting fee was $20, so Ryan and I split it and tasted two chardonnays and three Pinot Noirs. The wines ranged from $25-$50 (but the $25 Chardonnay and the $30 Pinot Noir were not nearly as good as the more expensive bottles). There was also a tasting for members only, which included a GSM. They happened to have that bottle open, so we got to try it. It was our favorite wine, so we bought two bottles. It wasn’t cheap ($45 each), but I wanted at least one, and with the purchase of two bottles the tasting fee is waived, so the second bottle was really only an additional $25. The tasting room was beautiful and comfortable, and I’d definitely visit again!
Next door to the Cheese Shop, Wrath has three different tasting menus in addition to a cheese and cracker platter. The standard tasting was $10 and had three wines (Sauvignon Blanc, Chardonnay, and Pinot Noir), which is what the wine passport cards covered this tasting. The other two tastings were each $20 and had five wines to taste, and I would have much preferred one of those. We were not offered the option to use our cards and pay the difference, but I also didn’t ask because I didn’t realize that would be an option. So in this case, the wine passport doesn’t save any money – each card is worth $10, and the standard tasting was $10. In fact, we only used one card because we bought a bottle of the Sauvignon Blanc (only $19) and waived one of our tasting fees. I do highly recommend the cheese platter, which features three cheeses (purchased from the cheese shop next door).
If you like sparkling wines, make sure you stop at Caraccioli! The tasting here costs $20, so this is where the wine card might work in your favor. Instead of paying $20 for six wines, the card gets you three tastes. Since there isn’t an option to only pay $10 for a tasting, this allows you to get a sampling of what Caraccioli offers (including the Brut Cuveé, a Chardonnay, and a Pinot Noir) without paying $20 to taste. I didn’t want to miss out on the rosé or the extra Chardonnay and Pinot, so we were offered the option to use the cards and pay $10 to taste them all. Caraccioli also had a Library Tasting for $15, which has the 2007 Brut Cuveé (the one on the standard tasting list is 2010) and the 2007 Brut Rosé. The cards cannot be used toward the Library Tasting, but if you’re a fan of bubbly like me, this is a must! We didn’t buy anything because our favorite wines were all quite pricey, but I think I’ll plan to use my 10% off coupon here the next time we visit, and get a couple of bottles of the sparkling wine. We visited Caraccioli not long after breakfast, so we skipped on the food, but they do sell a cheese and charcuterie plate, as well as a few other small bites.
4.
Shale Canyon Wines (and
Blair Estate)
Shale Canyon was my favorite of the tastings we did in Carmel. They share a room with Blair Estate, and they trade off each week manning the tasting room. We had the pleasure of learning about both wineries from Jake, who is one of the owners of Shale Canyon. We were told that we could use our cards to taste either the Shale Canyon wines or the Blair Estate wines, and we both chose Shale Canyon because we wanted to take a break from the Chardonnays and Pinots for a minute. It was a very relaxed and personalized tasting experience, and we ended up being able to taste a couple of wines that interested us from the Blair wine tasting list as well. Some of the highlights for us included the Shale Canyon Mourvedre, Tempranillo, and Malbec. We bought several bottles of wine, and Jake waived our tasting fees, which means we didn’t have to use a wine passport card. We will definitely be visiting the tasting room on our next visit to Carmel!
5. Galante Vineyards
Galante’s western-themed tasting room definitely has a fun and lively vibe. That being said, it wasn’t one of my favorites, but I may be biased for a few reasons: (1) it was our last stop on a long, hot day, (2) it was overly crowded [and we had a sleeping baby in a stroller – who didn’t wake up!], (3) there were dogs in the tasting room, and (4) I just didn’t love the wine. The wine passport might make some sense here, but ended up being a wash for us, since I splurged and added an extra wine. Their normal tasting menu is $15 for a taste of 5 wines – all 4 from the top portion of their list (a 50/50 Malbec and Merlot blend, a Malbec, a Bourdeaux blend, and a Cabernet Sauvignon) and 1 from the reserve tasting list (two Cabs and the “Grand Champion” – a blend of Cabernet Sauvignon, Malbec, and Petite Syrah). You could add additional tastings for $5, so for $25 you could taste all 7 wines. With the wine passport, we were able to taste all four wines from the top portion of the list, and I ended up paying an extra $5 to try the Grand Champion, since I didn’t love any of the first few wines. The Grand Champion was definitely the best of the bunch, but still didn’t compare to some of my other favorites from earlier in the day. They also have wines available by the glass (prices vary) and a cheese plate for $12.
Scheid’s tasting room is clean and bright, and definitely a good place to start the day. It has a more sophisticated vibe than many of the other rooms, so I wouldn’t want to show up here at the end of a long day of tasting! This is another tasting room where it didn’t make a difference to us whether we used the passport card or not – their standard tasting is $10 for 4 wines (so you can use the card in lieu of paying $10), and you can choose from a list of 8 (half white and half red). They also have a Claret Reserve and a sparkling wine, each for an additional $5. So we did one of these tastings, plus I added the sparkling wine, because I can’t resist. They also have a reserve tasting for $25 – not covered by the wine passport, but we got one of these as well. It included three Pinot Noir and the aforementioned Claret Reserve. We very much enjoyed the wines. They also waive the tasting fee if you purchase two bottles, which is always a nice bonus.
Finally – a tasting room that actually gave us a reason to use our wine passport cards! The normal tasting is $15 for 4 wines (Rosé, Chardonnay, Pinot Noir, and Barbera). With the wine passport, we were able to taste the first 3 wines (remember that each card is essentially worth $10), plus we could add the Barbera for $3! We added the Barbera (which was well worth it – definitely the best wine they had!), so we tasted all 4 wines while we learned a bit about the owner – Alan Silvestri. He’s a composer and has scored over 100 films. They had a list available, so it was fun to look through and count the movies we had seen.
I was debating whether I should do one more tasting before we left on Monday afternoon. I popped into Manzoni to see what they were pouring (Chardonnay and Pinot Noir, but also Syrah, and they usually have a Rosé, but they were out of it). Their normal deal is $10 for 4 tastes (they had six wines to choose from normally, but they only had 5 since they were out of the Rosé), and you could pay $2.50 to taste additional wines ($12.50 for 5 or $15 for 6). With the wine passport pass, you could taste 3 wines, so it’s not a good deal…for anyone! I didn’t really need another tasting, so I left without trying their wines (if we do visit again and decide to taste here, we will definitely be paying for a tasting and not wasting one of the wine passport cards).
Overall the wine passport was NOT a good deal for us. There were a few wineries that actually gave it some purpose, but for the most part we would have gotten the same deal if we had just walked in and paid. However, the 10% off coupon could be a tie-breaker, especially if you use it on a larger wine purchase (I’m not sure if there’s a limit or not). I wouldn’t recommend the passport to any of my friends, since it’s a big commitment to use all of them (we visited 6-7 participating wineries and we both tasted at most of them, and we still didn’t use them all), and if you are more than a very casual wine taster, you’ll likely be enticed by some of the premium tastings, which aren’t covered by the wine passport.
Note: we did not visit Dawn’s Dream Winery, De Tierra Vineyards, Winery Oaks, Smith Family Wines, or Carmel Road, so I’m not sure what their wine passport deals are. We do have three wine passport cards left (after our mix of either using two cards, sharing one tasting, or paying for the tasting ourselves), so maybe we’ll check a few of these out the next time we visit Carmel!


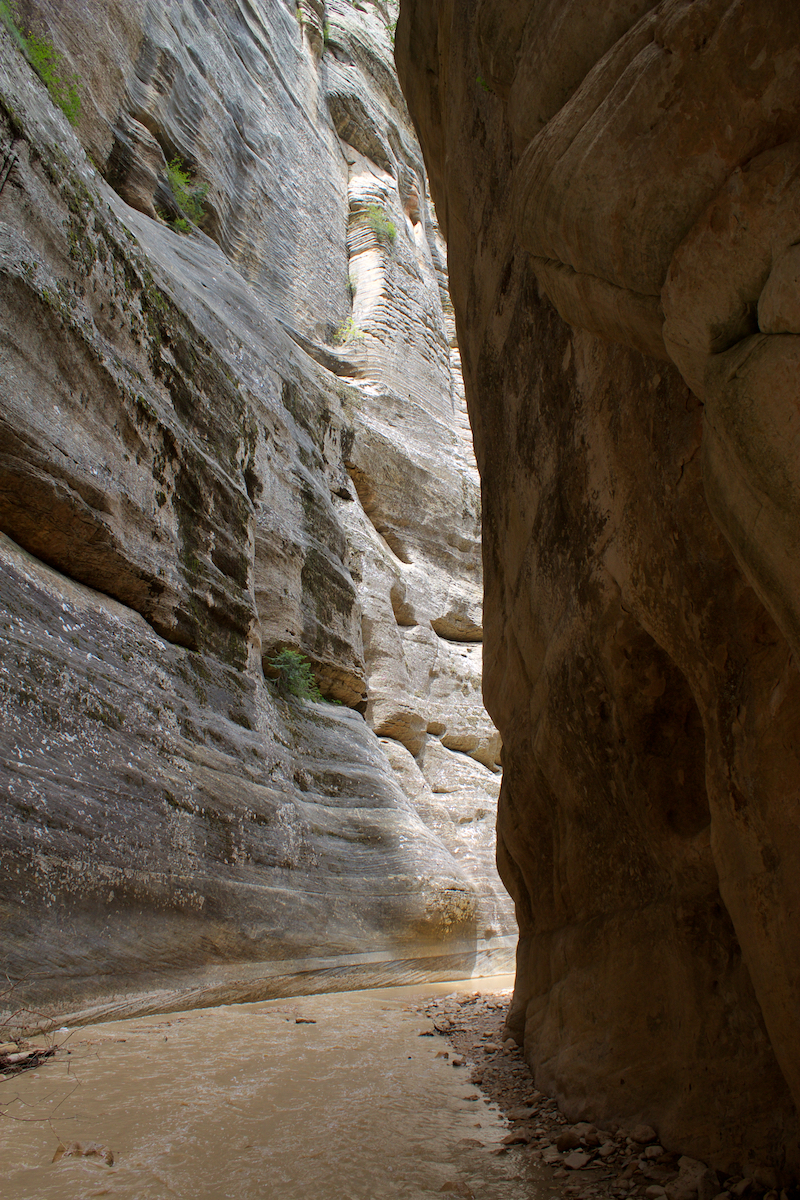
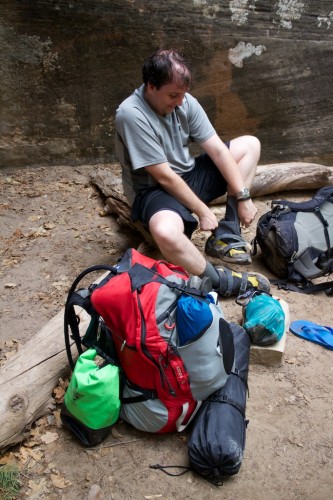 As first time backpackers, understanding the equipment needs for the hike was a chief concern for us, especially with the unique conditions of the Narrows. We were fortunate to have a friend with a lot of backpacking gear we could borrow. However, the Narrows present the unique challenge of keeping equipment dry when being completely submerged in water. Accordingly, we purchased a few dry bags online. Here is what we brought for our excursion in July: