Guide to the Top-Down Narrows in Zion National Park for First Time Backpackers

The Narrows is the centerpiece of Zion National Park.  The mystery of sun rays filtering through the constricted slot canyons of the Narrows captivate visitors like few other natural wonders.  The surreal photographs of the Narrow ultimately inspired us to embark on our first ever backpacking trip, despite its length, logistical complexity, danger, and technical elements.  The top-down Narrows trail is not a beginning backpacker’s route, but it is very possible for first timers to enjoy and safely complete, especially after reading this guide!  The award is unforgettable vistas, numerous adventures to share with others, and a tremendous sense of accomplishment.

The Narrows - Wall Street

When to Go?

Deciding when to visit Zion National Park to backpack the Narrows is tricky.  The National Park Service will not issue backpacking permits unless the flow rate of the Virgin River North Fork is below 120 cubic feet per second.  On average, spring runoff keeps flow rates above this level into May.  In the summer, starting in July, the risk of flash floods picks-up.  And after this risk subsides in late September, water temperatures have dropped to the point where wetsuits are recommended.  The graph below, constructed using historical USGS river data and NOAA temperature data, presents these trade-offs throughout the year.  We decided to go on the July 4 weekend, just after flow rates have dropped and water temperatures have risen, but before flash flood risk picks-up.  Unfortunately, we had to endure high daily temperatures, but the water and the shade in the canyon generally kept us cool.

Virgin River Conditions for Hiking the Narrows Graph

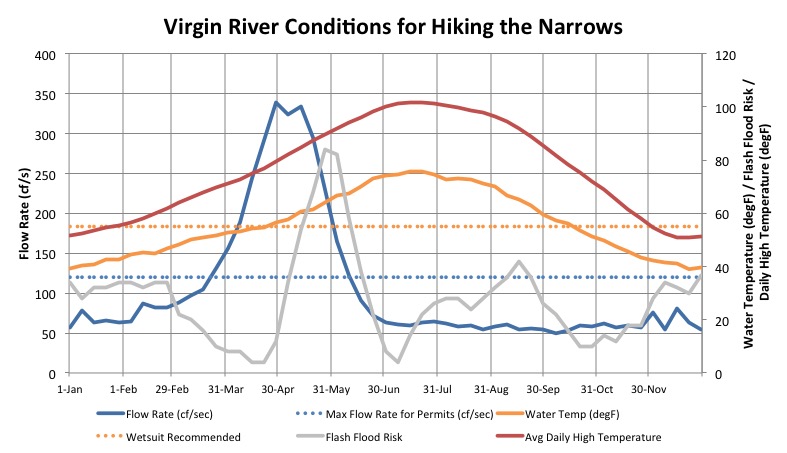
Graph Details: Flow rates are measured for the North Fork of the Virgin River, and represent average values going back to 1963 (data source: USGS).  Water temperatures are measured downstream in Virgin, UT, and are likely several degrees warmer than the water temperature in the Narrows (data source: USGS).  Flash flood risk is constructed by tracking the number of days where > 500% average flow was observed historically by week.  Average daily high temperatures are measured in St. George, UT (data source: NOAA) and are likely 10 degrees or so warmer than what would be experienced in the Narrows.

Logistics

The National Park Service only allows twelve groups of backpackers to stay in the Narrows each night.  Prospective hikers have two options: commit two months ahead of time and try and reserve one of six campsites online or try your luck  to get one of the other six campsites made available the day before at the Zion Canyon Wilderness Desk.

We opted for the former, and logged-in to the Wilderness Reservation System the minute reservations became available for July at 10am MDT on May 5 (see complete calendar).  We sweated for fifteen long minutes as the successive confirmation pages took forever to load.  Our patience paid off (we didn’t act on our temptation to refresh), and we were rewarded with a reservation for a campsite (#9) and hiking date of choice.  I don’t believe there would have been any time for considering our choices, so I recommend researching the campgrounds on the Zion National Park website first and being ready to act as soon as reservations become available at 10am.  Make sure the campground you select can accommodate your group size.  Also note that you will be the only one at a particular campsite.  The National Park Service does not combine groups at campsites, so even if you reserve a campsite with room for twelve, and you only have two people, you’ll have the campsite to yourselves.

During the hike, we ran into a couple of groups that obtained their permits the day before the Wilderness Desk.  The Wilderness Desk does not open until 7am (8am in Winter), but the groups we talked to were waiting outside before 5am.  I can’t guarantee that arriving at 5am will guarantee you one of the six spots available, but it’s a data point.

In addition to the backpacking permit, the other logistical item that must be addressed beforehand is transportation to the trailhead.  The Narrows Top-Down hike begins at Chamberlin’s Ranch, which is 32 miles from Springdale, over half of which are on slow, winding dirt roads (trip time is about 90 minutes).  There is limited parking at the trailhead that would allow a group with multiple vehicles to park overnight and return the next day, but we opted to pay for a ride through Zion Adventure Company.  They offer daily shuttles arriving at the trailhead at 7:45am or 11:00am for $37/person.  As discussed later on, with the amount of time it takes to traverse the Narrows, we were glad we took the earlier option, even though we were staying overnight.  There are other outfits that offer shuttles, but it is definitely a good idea to book early, because you’ll be competing with both backpackers and people attempting to do the Top-Down hike in one day.

Equipment

ZionEquipment
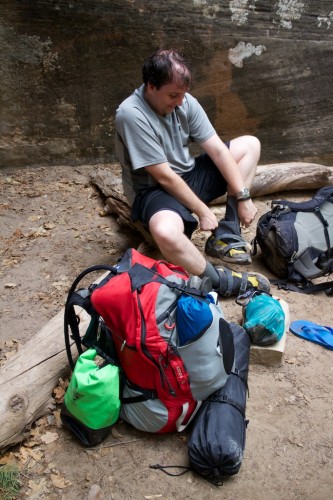
As first time backpackers, understanding the equipment needs for the hike was a chief concern for us, especially with the unique conditions of the Narrows.  We were fortunate to have a friend with a lot of backpacking gear we could borrow.  However, the Narrows present the unique challenge of keeping equipment dry when being completely submerged in water.  Accordingly, we purchased a few dry bags online.  Here is what we brought for our excursion in July:

  • Backpack: Our friend let us borrow 2 backpacks with about 4500 cubic inches of space.  As a novice packer, we needed every spare cubic inch of that space for our equipment.  Both backpacks were also equipped with a Camelback-style water storage system.  On the second day of the hike, we received the tip that the backpacks should be tightened so that they stay high up on your back.  We wished we would have known this early, as we found our backs were far less sore on the second day.
  • Tent: A small 2-person backpackers tent was a good compromise between comfort and weight and space requirements in our packs.
  • Sleeping Bags: We brought two synthetic sleeping bags also borrowed from a friend.  Synthetic was a good choice, instead of wool, because if they did get wet, it would be far less devastating.  We also didn’t need the superior insulation qualities of wool in July.  Along with the sleeping bags, we brought two lightweight sleeping pads we strapped to the back of our backs to provide a bit of padding on the hard ground.
  • Shoes & Socks: We rented the warm water package from Zion Adventure Company that included neoprene socks, Cannoneer-2 water shoes, and a hiking pole for $35 for the two day hike.  The shoes provide great traction and are probably reasonably comfortable considering all the rock hopping we did in them.  However, my wife was disappointed that they are not particularly stylish.  The neoprene socks did keep our feet dry and warm, and were not too uncomfortable.
  • Dry Sacks: We bought dry sacks in a variety of sizes for our hike to keep our equipment dry, including two bags large enough to contain our sleeping bag (20 liter), and small ones for our camera and phones (3 liter).  These proved essential, as we went through several chest deep areas and would have had to live with wet sleeping bags or malfunctioning electronics without the protection.
  • Sustenance: For the one night, we decided to survive on cold food instead of packing a stove.  Beef jerky, dried fruit, granola bars, cheeze-its, and turkey sandwiches provided plenty of variety and were easy to pack and carry.  We also brought along a water filter to re-fill our camelbacks.  We passed another group that was using a UV light, but they mentioned it isn’t effective if the water isn’t clear (which it wasn’t on our first day).

The Hike

After arriving at the trailhead by shuttle and getting our gear ready, we started our hike just before 8am.  During the hike, we compared our times to the timetable provided on the map provided by the Wilderness Desk.  We’ve provided a comparison of our actual achieved times against the time guidelines in the table below for day one:

Landmark Official Time Our Time
Bulloch’s Cabin 1 hour 50 minutes
First Narrows 3 hours, 30 minutes 3 hours, 50 minutes
Waterfall 4 hours, 15 minutes 5 hours, 30 minutes
Deep Creek 5 hours 6 hours, 15 minutes
Campsite #9 6 hours, 15 minutes 7 hours, 45 minutes

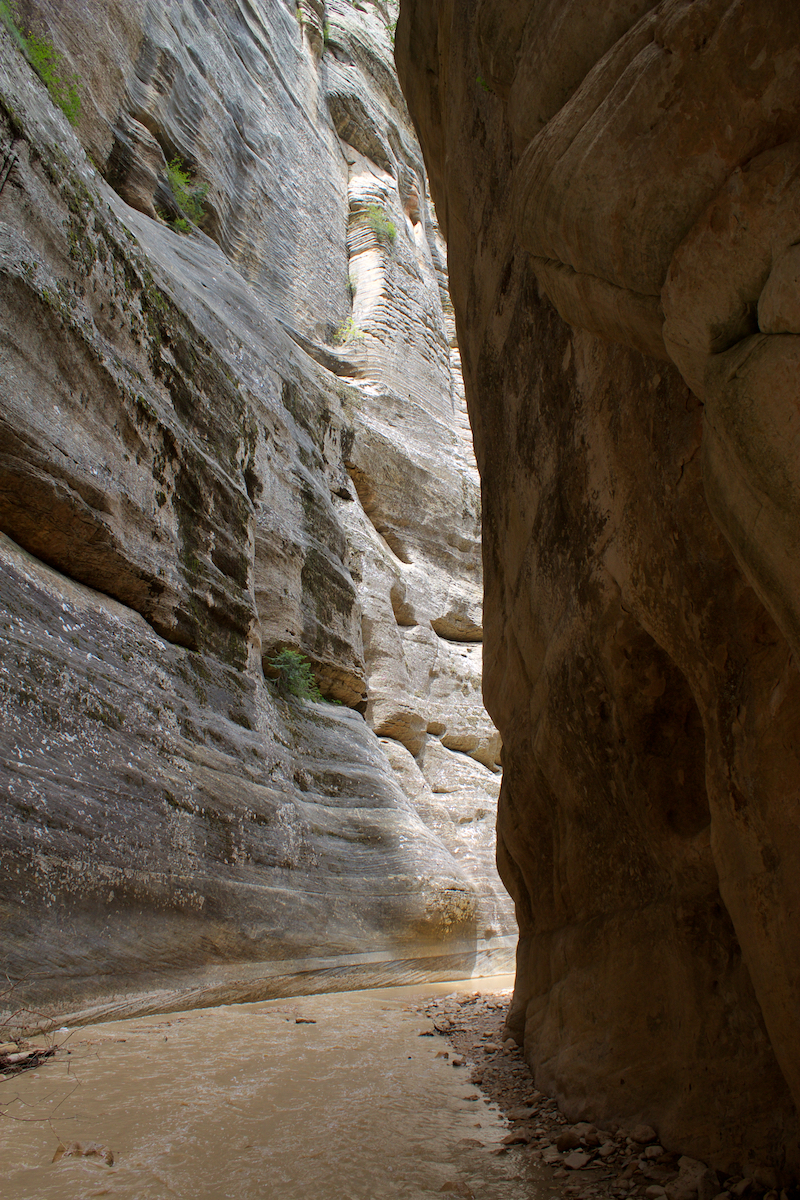
To our distress, we found ourselves quickly running increasingly behind the time guidance after we entered the water, even though we were outpacing other hikers.  This especially proved unnerving after lunch when it began to rain and we heard thunder, potentially indicating a risk for flash floods.  We believe a big reason for our slow pace is that at first, we spent a lot of time hiking in the water.  We later discovered that trails have been cleared along most of the route, and that there are only small portions of the river that need to be transversed directly.  Traveling in the river is generally slower, due to unexpected rocks and occasionally strong currents.  In retrospect, we wished we would have not stressed too much about keeping to the official timeline, and took more time to enjoy the scenery.  The Upper Narrows (see snapshot bellow) between Bullock’s Cabin and the waterfall offer views that rival those in Wall Street (the famous narrows closer to Zion Canyon), but with complete solitude.  It is really a spiritual experience.

Upper NarrowsDespite our back aches from our heavy packs, we were very pleased we opted to stay overnight.  Our feet were extremely sore by the time we reached campsite #9 and I couldn’t imagine going much further.  We were also very happy we started on the early shuttle, as it was already 3:45pm.  With just enough energy to change into more comfortable camp clothing and eat our packed supper, we went to bed fairly early.

We had a slower start than we would have liked the next day.  We didn’t leave camp until around 8am.  Originally, we wanted an earlier start to beat the crowds in Wall Street hiking up the river.  Unlike our experience on the first day, we were able to mostly keep up with the time guidelines provided by the Wilderness Desk.  Here is a table with travel time on day two from Campground #9:

Landmark Official Time Our Time
Big Spring 1 hour, 5 minutes 1 hour, 15 minutes
Orderville Canyon 3 hours, 45 minutes 4 hours, 30 minutes
Riverside Walk 5 hours, 35 minutes 5 hours, 45 minutes
Temple of Sinawava 6 hours, 5 minutes 6 hours, 5 minutes

By the time we reached Wall Street, which starts just beyond Big Spring, we did start seeing day hikers.  Luckily, even with our late start, the crowds were pretty thin until we reached Orderville Canyon.  After Orderville Canyon, however, it became a zoo.  The crowds really tainted the experience, and probably sped us up to get the hike over as soon as possible.  We would definitely recommend getting an earlier start to avoid this experience.

We were extremely thankful that the last mile of the hike was paved.  We actually found ourselves walking very quickly and passing the day hikers.  Walking on level ground just seemed so easy after the rock hopping we had been doing for most of the last two days.  After getting to the trailhead, we were able to get on the second shuttle departure and recuperate back in Springdale.  We arrived safe and extremely tired, but very proud of what we had achieved!

Swiss Rail Pass Evaluation: Extensive Benefits Justify Price

Swiss PassOur upcoming journey to Switzerland will be our first Europe trip since our first international trip together in 2009 in which buying a rail pass makes sense relative to purchasing individual tickets.  In our last train-intensive trip to Europe (Portugal/Spain 2012), we actually determined that planning ahead and buying tickets directly from the operator lead to greater savings than a rail pass.  This same rule applies to our planned travel in Germany and Austria during this trip, however the comprehensive benefits of the Swiss Rail Pass make it the clear choice for funding our transit within Switzerland.

The Swiss Pass is different from the passes offered by Eurail that are the standard in most countries.  Although Eurail offers regional or global passes that include Switzerland, the Swiss Pass, with its associated benefits, is only available from Swiss Travel System.  Also unlike the Eurail passes, the Swiss Pass offers free fare on local transit options, free admission to many of Switzerland’s best museums and attractions (link to master list), and free rides on many of the mountain cablecars and railroads.  Our first analysis, without considering these benefits, indicated individual tickets would actually be very comparable to a pass at around 305 CHF for our total train travel cost in Switzerland (cost of a 3-day flexi pass, 20 CHF shipping, and one ticket not included on the pass vs. 5 individual rail tickets and Mt. Rigi Majestic Round Trip).

Once we started looking at are other planned activities in Switzerland, however, we began to realize the benefit of the Swiss Pass.  The “flexi pass” we originally evaluated (which does not require the pass days to be consecutive), only offers the benefits on travel days.  Most of our planned activities will not occur on the same days we travel, so to take advantage of the Swiss Pass benefits, we needed to instead evaluate buying a normal 8-day Swiss Pass, which would cover travel and activities for our entire stay in Switzerland.  For a couple, this pass costs 365 CHF per traveler (including the 10% saver discount and 20 CHF total shipping for 2 passes).  Here are the expected benefits we expect to accrue with the pass per person (organized from largest value to smallest):

With this list, we value the Swiss Pass at 437.90 CHF, giving us 73 CHF relative to the individual cost.  Not spectacular savings, but combined with the convenience of avoiding ticket lines, it is a clear choice for us.  We really like how Swiss Travel Systems has put together a product that integrates sightseeing priorities, train travel, and local transit.

For others, its important to do an analysis to understand the value of a pass, and perhaps more importantly, whether a flexi pass or regular pass works best for their situation.  It is possible a multi-country Eurail pass makes more sense, if the sightseeing priorities don’t provide enough savings, and there are also other passes available that give you half price on train travel that may be worth consideration.

High Priority New York City Tourism Sights & Experiences

On our trip to New York City, we purposefully wanted to plan a “non-touristy” itinerary.  We specifically chose a location away from Times Square, and searched for unique and local eateries for our meals.  However, we ultimately realized it would be impossible to completely avoid visiting some of New York’s top tourist attractions.  Below are some of the select experiences we chose to visit during our trip:

September 11 Memorial

9/11 Memorial

The September 11 Memorial was a clear must-see for us as members of Generation Y, with childhoods undoubtedly shaped by the tragic events of that day.  The newly-opened memorial is a fitting tribute to the heroes and lives lost that day.  At the time of our visit, construction was still progressing on a permanent museum and the dramatic Freedom Tower adjacent to the memorial.  The waterfalls and pools in the footprint of the 2 former towers are magnificent in both scale and beauty.  The sound of the moving water is soothing amidst the clammer of a bustling city.

We utilized the advanced reservation system offered on the 9/11 Memorial website, which allows you to select an entry time and skip an entry line for $2 per pass.  If you have a printer, you can report directly to the memorial site.  Unfortunately, we made our reservation after leaving on our trip and needed to pick-up our reservation pass at the “Preview Site”, which is quite a detour and required waiting in a queue that was longer than the non-reservation line at the site that day.  Make sure an look for the brochure guide after entering the site, which provides good background information on the memorial (we missed it at first in anticipation of checking-out the pools).

 The Met 

Metropolitan Museum of ArtWe wanted to visit at least one museum on our NYC trip, and after reviewing our options, the Met (short for Metropolitan Museum of Art) seemed like the obvious choice.  The size, variety, and significance of the Met’s collections astounded us.  Having visited the Louvre, the Prado, and other famous European art museums, we decided to focus our tour on American art.  The museum’s American Wing features gorgeous landscapes (our favorite was one of the Andes), prime examples of American impressionism, and even stained glass pieces by Louis Tiffany.  In addition, they have amazing artifacts from Greece, Asia, and an impressive European art collection of their own.  We finished our visit with a stop at the rooftop bar, which offers excellent panoramic views of Central Park.

The Met offers “pay as you wish” admission, with a suggested donation of $25.  Although expensive, the comprehensive exhibits at the Met may warrant the high price tag.  Our ticket agent was very forward with allowing us to pay an amount we deemed appropriate.  Since we weren’t spending the whole day at the Met, we decided $12 each would be sufficient.  We definitely plan on returning on our next visit.  During our half-day visit, we didn’t cover more than 5% of what the museum had to offer.

 Empire State Building Observation Deck

Empire State Building Observation Deck


The Empire State Building wasn’t on our original itinerary.  The high cost ($27/person to the 86th floor) and long lines deterred us.  However, after a broadway show, an excellent peruvian dinner, and many glasses of wine, it somehow seemed like a good idea for us to walk 2 miles across Manhattan to catch the last elevator up the Empire State Building at 1:30am!  I’m glad we did!  Remarkably, the observation deck at the Empire State Building is open until 2am every night, with the last elevator leaving around 1:30am.  Not surprisingly, we found absolutely no lines and were virtually alone on the observation deck.  I had previously viewed NYC from the Top of the Rock observation deck, but the vantage point is really no comparison to what is offered at the top of the Empire State Building.  For $44/person, visitors are offered a view from the 102nd floor, but I would doubt that the extra 16 floors is worth the expense.

Venice in November – Acqua Alta Risk?

Acqua Alta

We are visiting the end of November, which is at the height of the Acqua Alta (or high water) season.  A last-minute change in our trip plans this year and work schedule conflicts led to us scheduling our Italy trip later than we’d normally go.  Despite the weather risk, we are confident we’ll still have a great trip after doing some research.  Let me explain…

Acqua Alta

Graph created using data from City of Venice

The graph above is scary for a November Venice visitor.  Since 1872, one third of all Acqua Alta events (defined as tides 110 cm above sea level, effectively flooding 14% of the city, and most visibly, St. Mark’s Square) have occurred in the month of November.  Over time, due to subsidence and human modifications to the natural environment, the frequency of events has increased.  In recent history (since 1966), Acqua Alta events occur about 4 times each year.  What the graph and pictures don’t show you, however, is that Acqua Alta events are actually fairly short in duration.  A similar graph to the one above on the City of Venice website shows that Acqua Alta events occur predominately in the morning, between 8am and noon.  The actual time where flooding occurs is driven by the tide cycles.  As seen in the graph below, showing the tide cycles over 3 days, the peaks span at most 4 hours.  So, at worst, an aqua alta event will impact a morning.  It’s also important to remember that the Acqua Alta events are driven by astronomical reasons, not meteorological.  Just because the water is high, doesn’t mean it’s raining.

Venice Tide ChartThe final thing we uncovered in our research that made us comfortable visiting Venice in November is the amount of resources the city invests in preparing for Acqua Alta.  In addition to a dedicated monitoring and warning department, the city also erects elevated platforms along main streets to allow people to walk above the water.  The vaporetto water buses continue to operate and many hotels we looked at provide water boots for guests.

In addition to reading about Acqua Alta, we also took a look at the historic weather trends for late November.  Weatherbase.com is a great resource for pulling weather statistics by date.  For this trip, I built a quick Excel spreadsheet to summarize the temperature trends, chance of precipitation, and chance of “heavy rain”.  For our time period of interest, I obtained the following results:

Avg. Low Avg. High Any Precipitation “Rain”/”Heavy Rain”
40 51 17% 2%

We felt very comfortable with the results.  We can mitigate cold temperatures with warmer clothing, and a 2% chance of heavy precipitation doesn’t seem unreasonable compared to what we’d expect at any place anytime of the year.

After addressing the weather risk, we became extremely excited to visit in the off-season.  Visitors are often turned-off by the extreme crowds in Venice.  We last visited in early September, and although very crowded, we still enjoyed ourselves and found seclusion in the city late at night.  However, in late November, we are expecting solitude even in the daylight hours.  According to statistics from the Veneto Region government used to construct the graph below, November is nearly tied with December and January for the lowest nights spent by tourists in Venice per month.  Relative to when we last visited September, there will be almost as little as a third of the people visiting Venice.  Meanwhile, unlike more rural destinations or seasonal destinations, Venice will be completely open for business in November.  All of the hotel and restaurant options we’ve looked at are open.

Nights Spent in Veneto by Month

We were able to use online resources to effectively address our concerns about weather in Venice in November.  We are looking forward to a very romantic visit and an opportunity to see one of our favorite cities with far fewer crowds.

Planning a Machu Picchu Day Trip from Ollantaytambo

For us, Machu Picchu was the catalyst for planning a trip to Peru.  Although we later learned of Lima’s revered cuisine and the spectacular views in the Sacred Valley, Machu Picchu is still the most important stop on our itinerary.  Accordingly, a lot of research and thought went into our ultimate plan for a day trip to visit Machu Picchu from Ollantaytambo.

Seeing Machu Picchu at sunrise was an important consideration in our planning.  Many visitors accomplish this by staying the night at Aguas Calientes (the town right below) the night before and catching the first 5:30am bus up to the site.  However, most of the lodging in Aguas Calientes is very expensive, and the town itself is described as run-down and devoid of character.  This realization, combined with reports of extensive fog in the morning and the discovery that trains from Ollantaytambo leave as early as 5:07am (arriving in Aguas Calientes at 6:34am), led to our decision to do a day trip from the Sacred Valley, as opposed to doing an overnight stay at Aguas Calientes.

Trip reports from others stress the importance of planning ahead of time.  There are a limited number of trains that run to Aguas Calientes, and it is sometimes impossible to make plans once arriving.  Even over 2 months ahead of our trip, we found that several train options (including one we figured would be the most convenient were already booked).  Additionally, the park itself limits the number of visitors to 2500 per day, and only 400 per day (in 2 time slots) for climbing Huaynapicchu (a popular hike within the park).  Two months ahead, there were still 167 slots in the later afternoon climb and 2450 for general admission, but I did notice that in the current month, several days had no availability.

Luckily, both train and park tickets can be obtained online.  Although visitors can also go through tours or travel agencies, it is usually more affordable (and I think more fun) to plan independently.

Train tickets are available through 2 companies: Peru Rail and Inca Rail.  Most trains leave from Ollantaytambo, which is a great base for exploring the Sacred Valley.  Four trains per day (including the luxurious Hiram Bingham train) leave from Poroy near Cusco, traveling through Ollantaytambo on the way.  We decided to take the earliest train, the 5:07am from Ollantaytambo, to enable to us to get as early of a start as possible.  We selected the 6:22pm return train, given that it wasn’t long after the 5:30pm closing time for the park.  Besides the Hiram Bingham, Peru Rail has two different classes of train: the Expedition and Vistadome, but we paid more attention to the times than the type of train.

Booking on the Peru Rail website is fairly straightforward.  As with train operators in Europe, Peru Rail recommends you use a Visa card registered in the Verified by Visa program.  Unfortunately, fewer and fewer cards are participating in this program (I just read confirmations that Chase cards dropped out of this program).  We decided to try our luck with our United Mileage Plus Explorer Card from Chase, even though it’s not in the Verified for Visa program, because it now has no foreign exchange transaction fees.  To our surprise, it worked!  However, we later learned that because it was not a Verified by Visa card, we need to pick-up paper tickets at a Peru Rail office when we arrive in the country.  Verified by Visa transactions can get e-Tickets.  We are going to try and contact Peru Rail to see if there is a way around this limitation, because the hours and locations of their offices are not the most convenient.

Tickets to the Machu Picchu park are available on the website administered by the Ministerio de Cultura.  Despite frustrating lag time, Flash, and unreliable language selection, we were able to secure our tickets.  The first step is to select “MACHUPICCHU” in the left drop down and the desired admission (general or a Huaynapicchu time slot) and then you can view availability on different dates.  This is all done with the “Reservas” or “Reservation” tab selected on the top.  After inputing information for participants, you are actually granted a reservation without paying.  The next step is to select the “Pagos” or “Payments” tab to use pay for your reservation.  You’ll need the reservation code from the first step.  Unlike Peru Rail, cards with Verified for Visa registration appear to be mandatory on this site.  We were unable to get our Chase card to work.  After paying, the last step is to use the “Check-in” tab to enter the reservation code one last time to retrieve e-tickets that can be printed-out and used for entrance.  

Expect to pay a lot for the Machu Picchu experience.  The combined cost of the train tickets and site admission cost us $368 ($184/person). That price does not include the cost we expect to pay for a bus fare once in Aguas Calientes ($12 R/T).  However, it is nice to have the peace of mind that our transportation and admission are guaranteed before leaving.